Ample Business
Ample Business is a stunning, professional and flexible Business Consulting and Investments WordPress Theme based on Strong researches into the field of Business, Consulting and Investments. It is an impressive free business WordPress theme for professional Consulting and Finance industry, Financial Advisors, Insurance Brokers, Accountants, Lawyers, Finance Firms, Consultants, Investments Consulting Services, Advisors, Investment Experts, Trading and Investments, Technology Consulting,blog,shop and Business Development Agencies, or other Finance and Consulting related businesses.he layout of the theme has been well-organized and designed with supreme quality. With the unique set of widgets available in the theme, users can play with them and design it beautifully. Different kind of sections available such as Team Widget, Course Section, Testimonial Section where you can explore the information about your services in a professional manner.
Theme Installation
Via WordPress
Log in to the WordPress Administration Panels.
Go to the Appearance panel, then Themes.
Click Add New .
Upload the Zip file of theme, ample-business.zip
After installing the theme Click Activate button.
Via FTP
Use your FTP software to browse to wp-content/themes folder.
Extract ample-business.zip and upload the folder.
Once it’s uploaded, go to your WordPress Admin, browse to Appearance > Themes .
Click the Activate link.
Dummy Data:
Download the ZIP file of dummy data from here.
Import XML file via, Tools > Import > WordPress
VIDEO
Adding Contents
Posts
To create post on your site, it’s easy. Follow the below listed methods.
Go to Administration Panels
Go to Posts and Click on Add New
Give the title of the post and add the content
Set the featured image for the post from right corner.
Set that post on the Category.
Click on Publish Button.
Add more post like the above methods.
Pages
To create page on your site, it’s easy. Follow the below listed methods.
Go to Administration Panels
Go to Page and Click on Add New
Give the title of the page and add the content
Set the featured image for the post from right corner.
Click on Publish Button.
Add more page like the above methods.
Categories
To create categories, follow the below steps.
Go to Administration Panels
Go to Posts > Categories
Give the title of the category
Click on Save
The added category will appeared on the Add Post Page.
How to customize top header info
To customize top header info
Go to > Appearance > Customize > Top Header Info and check show > Notice Top Section > Latest Blog
Inside Top Header Info Option write name of Notice Title
How to customize Company Info
To customize contact Company Info
Go to > Company Info Option
Write the name of the address and phone number and also the email address
How to setup the slider
For setting up slider
Go to > Appearance->Customize
Go to > Home Page Slider Settings
Click Slider Option and check Show option
Go to Slider Setting Options->Select Slider Page, Select the text you want to appear in slider
Go to Enter Button Text and write the button name of slider
Go to Enter Button URL and put the link you want the link to go
To add another Slider again click Slider Settings Options and follow the above mentioned steps
How to setup Our Services area
For setting up widgets
Go to > Appearance and click widgets
Drag services Widgets and take it inside the Home Page Widgets Area
Go inside > Select Pages option and select any name you want to appear in the page
Click on add new section to add further names and follow the step as above
To add icons on these page name go to Pages->All Pages->Custom Widgets and click edit
At the right side there is Font Awesome class type fa-bars etc like font awesome names according to the icon you need in the page
Now go to > Appearance and widgets again
How to setup Team Widget Area
Go to > Appearance and click widgets
Drag Team Widgets and take it inside the Home Page Widgets Area towards buttom
Go inside the select pages and select name of the team you want to see in the page
To add further team members name click on add new section and follow above steps
To change the post of team members go to Posts->name of member(Gaelic singh)->click screen options and check Excerpt
Go down the page and edit the option field
How to setup Quote Widget Area
To setup quote widget
Go to > Appearance and click widgets
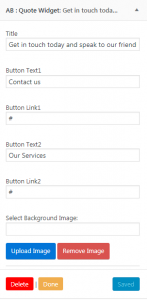
Drag Quote widgets and take it inside the Home Page Widgets Area towards bottom
Go inside > Title and write the name of title you want to appear on the page
To add button jot down the name of button inside Button Text1 field and Button Text2 field
How to setup Work Widget Area
To setup work widget
Go to Appearance > click widgets
Drag Events widgets and take it inside the work Widgets Area towards bottom
Go to > Select Category and select two categories HTML(8) and word press(4)
How to setup Events Widget Area
To setup events widget
Go to > Appearance and click widgets
Drag Events widgets and take it inside the HomePage Widgets Area towards bottom
Go inside-> Select Category For events and select HTML(8)
How to setup Testimonial Widget Area
To setup Testimonial widget
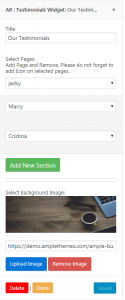
Drag Testimonials widgets and take it inside the work Widgets Area towards bottom
Go to > Select Category and select two categories HTML(8) and word press(4)
Inside > Select pages, select the name of people it indicates review people gives who can be patients, chairman ,doctors anyone
To upload background image > select image and upload there
How to setup Latest Blog Widget
To setup Latest Blog
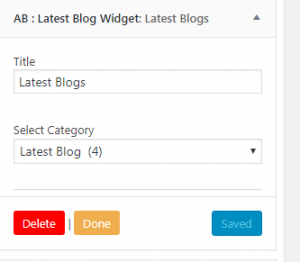
Drag Latest Blog widgets and take it inside the work Widgets Area towards bottom
Go to > Select Category and select latest Blog(4)
How to setup Notice Board Area
For setting up widgets
Go to > Appearance and click widgets
Drag Notice Widgets and take it inside the Home Page Widgets Area towards buttom
Go inside > Title option and write any name you want to appear in the title say Notice Board
Go inside > Select Category and select latest blog(4) which shows latest number of 4 blogs
Go to upload image to upload the image you want to appear in this section
How to setup Info Widget
To setup Info Widget
Drag Latest Blog widgets and take it inside the Info Widget
Go to > Title First and write the name of place
Go to > Sub-title First and inside > Title Second write phone number
Go to Sub-title second and write unique name of phone number and same goes for other titles
How to setup Theme Widget
To setup Theme Options
Go to > Appearance >Customize >Theme Option >Front Page Options and check hide option and click publish
How to hide FrontPage Option
Go to Customize > Theme Option > Front Page Options >check > Hide Blog Posts or Static Page on Front Page
How to setup Footer Option
To setup Footer Option
Go to > Footer Option
Click Copyright
Edit inside copyright
How to setup Site Identity
To setup Site Identity
Go to > Logo and change logo
Go to >Site Title and change title name
Go to > Tag Line and change Tagline name
How to setup Header Image
To setup Header Image
Go to > Header image>Add new Image
How to setup Homepage
To setup Homepage Settings
Go to > Homepage Settings and check a static page
Go to > Homepage choose home
Go to > Posts Page choose Blog


